

Breeze Picture-In-Picture Guide, Page 1 / 2
Content
- What is a Picture-In-Picture (PIP) feature ?
- PIP in Breeze
- PIP in "View" and "Play" modes
- PIP video editing
- Example of PIP video editing
- Build PIP video sequence -"step by step" example
- Download source and processed video data for the "step by step" example
What is a Picture-In-Picture feature?
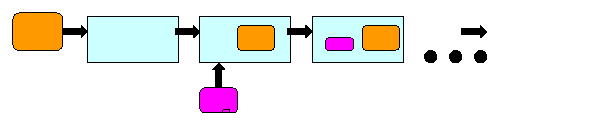
Term "Picture In Picture" (PIP) designates image, video sequence or image operation where resulting image or video sequence is assembled of two or more images or video sequences. One of those images / video sequences is called a “base”: base image or base video sequences. Others images and video sequences are called “insertion”: inserted image or inserted video sequence (see Figure 1).
Figure 1.

In Breeze "Picture In Picture" can be used in in all modes: "View" / "Slide Show", "Play" / "Replay", "Edit", "Convert".
Base "Picture In Picture" image can be taken from any of 4 available video ports and displayed in any video panel, primary or assistant.
Similarly, inserted "Picture In Picture" image can aslo be taken from any of 4 available video ports and displayed in any video panel, primary or assistant.
If video port is receiving data from the stopped or paused channel then displayed picture is static (presents no motion). If video port is receiving data from the playing channel then displayed picture is dynamic (presents video motion).
Inserted picture may present the whole source image where it is taken from or may be cropped of it, so it will be just a part of source image. Size of the image inserted into the base picture can also be adjusted.
Parameters of PIP operations can be set in the in the options dialog "Picture In Picture". It is accessed via the "Tools" menu or directly via the "PIP (Picture In Picture) Options..." command in the "View" menu.
Turning On and Off PIP operations can be done in the options dialog "Picture In Picture". But a faster way to do that is to use buttons "Enable/Disable 'Picture In Picture" buttons in the "View" toolbar or in the "View" menu.
PIP in "View" and "Play" modes
2 streams of video data can be merged into PIP image in a number of variants. As static picture in static, static in dynamic, dynamic in static, dynamic in dynamic. From any of 4 video ports available, in any combinations. Video stream played forward can be inserted as PIP into the base video stream played forward, or backward in forward, forward in backward, backward in backward. Etc.
PIP images can be captured on the "fly" in "View" (graphics) and "Play" (video playback) modes
Any video panel can be captured "As is", as PIP, and saved to the file instantly by clicking buttons in the "Channel" tool bar or "Channel" menu. Video data from the playing / replaying video channels can be saved to the file as PIP video sequence. Images captured from the channels with buttons "Get" in the control panel can be displayed as PIP instantly. Images copied from the different video ports or external applications can be pasted instantly to any video port and instantly displayed or saved as PIP. Any text prepared in the external applications and converted into MS bitmap format, can be pasted to any video port and instantly merged into the PIP.
2 streams of video sequences can be merged and save to the file as a "Picture In Picture". PIP video streams can be save to the external file or files in a number of formats. Video data saved to the file(s) during playback of primary / assistant channel may correspond to the video data in the primary / assistant video panel "As is", or be built on the base of video data from the channel itself.
All mentioned above capabilities can be used for multi pass layered "Picture In Picture" assembling of video sequences. Saving merged from 2 streams PIP video sequences to the file can be repeated sequentially with different PIP configuration setting and different source streams. It allows editing and assembling rather complex multi layered PIP video sequences. (see Figure 2).
Figure 2.
Sequential layers of images are gradually assembled in the required Z-order (vertical order). Inserted images can be placed in the different areas of base image, can be nested within each other, or can overlapped.
In the "Picture In Picture" video processing there are 3 distinctive types of video streams:
- Main input stream to the channel where PIP processing is done
- Input PIP streams used for building PIP images
- Processed output PIP stream.
Main input stream has always to be established and active during PIP processing. It is because building PIP images and saving them into the output PIP stream is synchronized with the influx of input frames from the main input stream. Number of output PIP frames is equal to the number of frames came to the channel from the main input stream. If main input stream is stopped or there are no more frames in it then output PIP stream is stopped too. Main input stream is always used as a synchronization "clock" for PIP operations.
On the other hand, main input stream may or may not be used as an input PIP stream. It depends on the requirements of a concrete PIP operation. If it is required, images of output PIP stream may be built without images from the main input stream at all. Images for PIP input streams can be taken from any of 4 video ports available, in any combination.
The situation where images from the main input stream are not used for building the output PIP images may look a bit unusual for beginners. But as long as the described above distinction between 3 types of streams participating in the PIP operations is understood, it becomes clear that this option increases noticeably flexibility and range of variants available in PIP operations.
That technique allows often using just only one input PIP video sequence and just one additional PIP image to build a new output PIP video sequence. It is used in the described below example to place a video sequences of "talking persons" (dynamic PIP input stream) into the static frames presented by just one image (static PIP input stream). It that example a static image residing in the auxiliary port 2 or 4 is selected as a PIP base image into the primary video panel. Second dynamic input PIP video stream is taken from the video port 3 of assistant channel and inserted into the base images. Merged PIP images are saved into the PIP output stream (file) set for the primary channel.
At the Figure 3 you may see an example of the image from the video sequence assembled as a layered "Picture In Picture".
Figure 3.
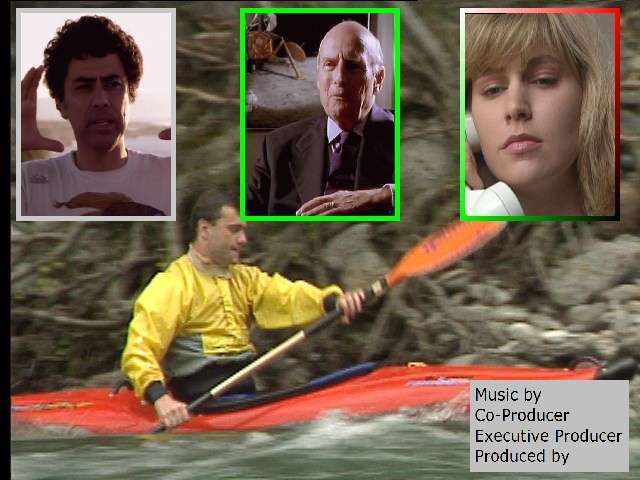
Finally assembled image (video sequence) consists of 8 individual images. In total it required 7 cycles of merging images into the "Picture In Picture".
In general there are two main ways to assemble multi part PIP image or video sequence. It can be done pure sequentially or sequentially-parallel.
In pure sequential method every new inserted image is laid out on the top of the previously made PIP image.
In sequentially-parallel method, at the first stage some closely related to each other images are assembled into the PIP sub groups. Then, at the second stage, already grouped PIP images are assemble into the final PIP image (video sequence).
For example, at the shown above picture (Figure 3), 3 images of talking persons were inserted at the first stage into the frames. Then framed images were sequentially inserted into the base picture.
Breeze settings and operations used for PIP layered assembling of Figure 3 are described in the next paragraph.
This paragraph describes an example of a PIP layered assembling. It is "step by step" description of all operations and Breeze settings used for assembling a video sequence presented by the image shown at the Figure 3
You can download source images for this example, intermediate frames and finally assembled frames. Links to these downloads you may find in the section Download source and processed video data for "step by step" example"
When several video sequences are merged as a "Picture In Picture", it is necessary to save intermediate semi assembled video sequences in one or multiple files. And it is important to avoid a degradation of image quality during that stepwise process. Image quality may degrade noticeably after several steps of loading and saving video sequences if intermediate images are saved with lossy image compression algorithms. Therefore it is better to save intermediate semi assembled video sequences with lossless compression algorithms, like PNG, MNG, lossless JPEG-2000, or MS bitmap. It will guaranty that quality of images will not degrade during sequential PIP assembling. Only finally assembled video sequence has to be saved with a high compression efficiency lossy algorithms.
The only disadvantage of lossless algorithms is their lower compression efficiency and, consequently, big size of saved files. As a result assembling of long high resolution video sequences requires usually a rather big hard disk space.
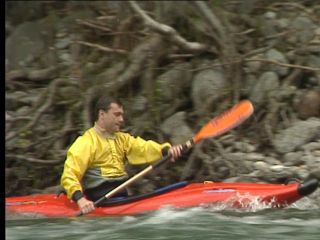
The composed video sequence shown in the Figure 3 was assembled from the source data shown in the Table 1.
| Video sequence | PIP type of video sequence | Reference picture |
|---|---|---|
| "Sport" | Base | Figure 4 |
| "Left frame" | Inserted | Figure 5 |
| "Central frame" | Inserted | Figure 6 |
| "Right frame" | Inserted | Figure 7 |
| "Left man" | Inserted | Figure 8 |
| "Central man" | Inserted | Figure 9 |
| "Right woman" | Inserted | Figure 10 |
| "Text" | Inserted | Figure 11 |
Figure 4, size 640 x 480
|
Figure 5, size 480 x 640. 
|
Figure 6, size 480 x 640 
|
Figure 7, size 480 x 640 
|
|
Figure 8, size 720 x 576 
|
Figure 9, size 720 x 576 
|
Figure 10, size 640 x 480 
|
|
Figure 11. 
|
Pictures of "talking people" in the figures Figure 12, Figure 13, Figure 14 , as they are seen at the Figure 3, were cut off the source pictures Figure 8, Figure 9, Figure 10, and then resized during insertion as a "Picutre In Picture".
Figure 12

|
Figure 13

|
Figure 14

|
General scheme at the Figure 15 shows how the final "Picture In Picture" images Figure 3 were assembled from the source data (see: Figure 4, 5, 6, 7, 8, 9, 10, 11).
Figure 15.
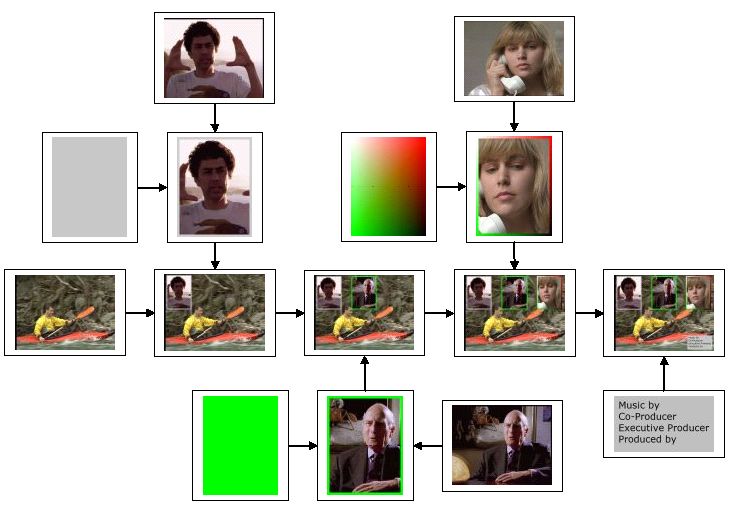
Main steps to assemble a whole PIP video sequence are the following:
- Place "left talking person" into the "gray" frame
- Place "central talking person" into the "green" frame
- Place "right talking person" into the "green-red" frame
- Place "left talking person in frame" into the base picture
- Place "central talking person in frame" into the base picture
- Place "right talking person in frame" into the base picture
- Place text into the base picture
Details of implementation and Breeze configuration settings for each of these steps are described in the next paragraph.
Go to Page: 1 2 Next